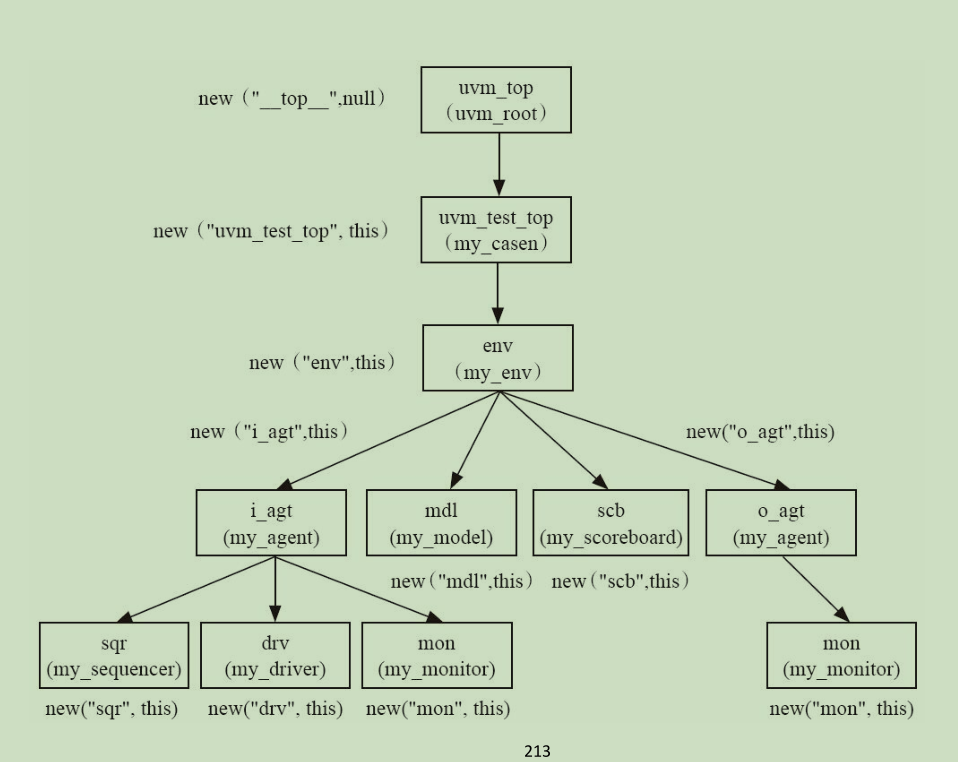
UVM中路径

面试常见问题
1.UVM对callback进行调用
1 | +UVM_CB_TRACE_ON(*) |
2.UVM的callback能够完成:
1 | 修改UVM组件的操作(*) |
LINUX 驱动开发必须在搭载LINUCX系统或虚拟机上进行,WIN10自带WSL不支持。
本机开发指宿主机和目标机是一台主机,即在本机上开发编译然后在本机 上加载运行(Linux设备驱动也可以直接编译进内核,但为了开发工作方便,一般采用动态加载的方式)
step1:查看当前主机内核版本号
1 | uname -r |
step2: 查看当前宿主机所有源码版本
1 | apt-cache search linux-source |
step3:根据宿主机内核版本号下载相应内核源码
1 | sudo apt-get install linux-source-$(shell uname -r) |
step4:配置内核,默认即可,也可采用原始配置单内存占用可能比较大
1 | make menuconfig //图形配置 |
step5: 编译Modules
1 | make modules |
step6: 安装 modules
1 | make modules_install |
这种开发中一般目标机为带有嵌入式处理器的开发板,而宿主机为PC,开发环境需要在宿主机上搭建,嵌入式Linux设备驱动开发的步骤如下(Cortex-A9架构的ARM开发板为例):
step1:
在宿主机上下载嵌入式开发板对应版本Linux的源码,并解压:https://www.kernel.org/
tips:最好用开发板或核心板附带的源码包
1 | # tar xvf linux-5.4.70.tar.gz |
step2:编译内核
1 | # apt install gcc-arm-linux-gnueabi make libncurses-dev bison flex |
step3:编译生成设备树
1 | # make ARCH=arm CROSS_COMPILE=arm-linux-gnueabi- dtbs |
step4: 在当前源码目录编译Modules
1 | make ARCH=arm CROSS_COMPILE=arm-linux-gnueabi- modules |
step5: 安装 modules
1 | make modules_install |
Linux内核从3.x开始引入设备树的概念,用于实现驱动代码与设备信息相分离。如在ARM-Linux内,一个.dts(device tree source)文件对应一个ARM的machine,一般放置在内核的”arch/arm/boot/dts/“目录内,比如exynos4412参考板的板级设备树文件就是”arch/arm/boot/dts/exynos4412-origen.dts”。这个文件可以通过$make dtbs命令编译成二进制的.dtb文件供内核驱动使用。基于同样的软件分层设计的思想,由于一个SoC可能对应多个machine,如果每个machine的设备树都写成一个完全独立的.dts文件,那么势必相当一些.dts文件有重复的部分,为了解决这个问题,Linux设备树目录把一个SOC公用的部分或者多个machine共同的部分提炼为相应的.dtsi文件。这样每个.dts就只有自己差异的部分,公有的部分只需要”include”相应的.dtsi文件, 这样就是整个设备树的管理更加有序。
hello.c
1 | #include <linux/module.h> |
Makefile
1 | ifneq ($(KERNELRELEASE),) |
指定架构及编译选项(可修改Makefile, 之后补充)
1 | make ARCH=arm CROSS_COMPILE=arm-linux-gnueabi- |
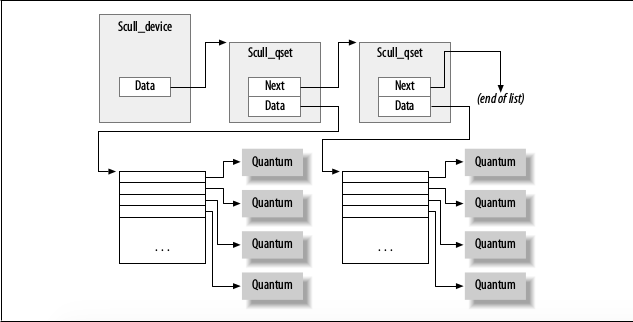
scull(simple character utility for loading localities,区域装载的简单字符工具)是一个操作内存区域的字符设备驱动程序,该字符设备并不是一个真实的物理设备,而是使用内存来模拟一个字符设备
设备模型:

源码参照: http://examples.oreilly.com/9780596005900/
由于ldd3书本是基于linuxn内核2.6,因此其大多驱动示例已经不能在最新版本内核编译。若想在最新版本内核编译驱动程序,可参照:
The example drivers should compile against latest Linus Torvalds kernel tree:
1 | * git://git.kernel.org/pub/scm/linux/kernel/git/sfr/linux-next.git |
To compile the drivers against a specific tree (for example Linus tree):
1 | $ git clone git://github.com/martinezjavier/ldd3.git |
1 | $ sudo apt-get install git |
xxx 替换成自己用户名和绑定邮箱
1 | $ ssh-keygen -t rsa -C "xxx@email.com" |
在github账号添加SSH密钥GitHub.
ttp://localhost:4500 本地host无法打开
原因:端口号被占用,hexo默认端口为4000
解决方案:指定hexo为其他端口
1 | hexo s -p 4500 |
wget 包下载
1 | wget https://mirrors.tuna.tsinghua.edu.cn/anaconda/miniconda/Miniconda3-py38_4.8.3-Linux-x86_64.sh |
软件安装(安装软件:安装过程中根据提示输入enter或yes)
1 | bash Miniconda3-py38_4.8.3-Linux-x86_64.sh |
验证安装:重启终端(必须),运行下方命令,显示版本号则安装成功
1 | conda -V |
更换国内源,在用户目录(/home/xxx)下新建.condarc文件并添加如下内容
1 | touch .condarc |
1 | channels: |
执行以下命令清除索引缓存,并查看配置确认换置完成
1 | conda clean -i |